You’re halfway through a precision cut. The client is trusting you. The light is good. You’ve done this technique a thousand times. But something feels wrong. The shears aren’t gliding through the hair the way they usually do. You’re pushing. You’re squeezing harder than normal. The ends look slightly frayed instead of clean.
You just ruined a cut with dull shears. And you didn’t even know they were dull until it was too late.
Most stylists don’t realize their shears are dull until they see the damage—uneven ends, bent hairs, split ends that weren’t there before, or the worst: a client who says “my hair feels different” and you know exactly why.
This guide will teach you how to recognize the early warning signs of dull shears, how to test your blades at home, and how to know exactly when it’s time for a sharpening—before you ruin another cut.
Why Dull Shears Are Dangerous
A dull shear doesn’t cut hair. It crushes it.
What Dull Shears Do The Result
Push hair instead of cutting it The hair bends, then breaks unevenly
Create friction and heat Damage to the cuticle; frizz and dullness
Require more hand pressure Fatigue; risk of repetitive strain injury
Leave jagged or angled ends Split ends appear faster; hair looks unhealthy
Pull on the hair shaft Client discomfort; potential for scalp irritation
A sharp shear glides through hair like a knife through warm butter. You barely feel resistance. The hair falls away cleanly. The ends look smooth and dark under magnification.
A dull shear fights you. And your client’s hair loses that fight.
The 7 Signs Your Shears Are Dull
Sign 1: You’re Squeezing Harder Than Usual
What it feels like: You notice your hand is tired after just a few cuts. You’re gripping the shears tighter. Your thumb is working harder to open and close the blades.
What’s happening: A sharp shear requires very little pressure to cut. If you’re squeezing hard, the blades aren’t meeting cleanly. You’re forcing the cut instead of letting the tool do the work.
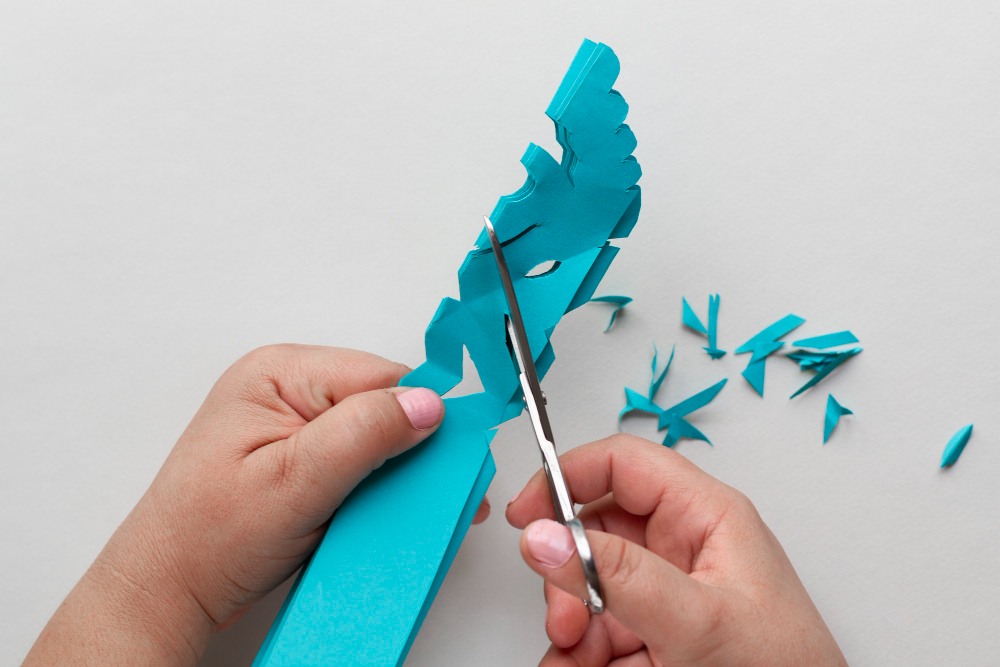
The test: Cut a piece of paper. If you have to squeeze hard or the paper tears instead of slicing cleanly, your shears are dull.
Sign 2: The Hair Frays Instead of Cutting Cleanly
What it looks like: Hold a cut section up to the light. Look at the ends. Do you see a clean, straight line? Or do you see little white dots, frayed edges, or angled tips?
Healthy Cut Dull Cut
Clean, straight line across the end Jagged, uneven, or angled
Dark, solid appearance White dots or frayed tips
Hair falls away easily Hair sticks or pulls
The test: Cut a small section of hair. Look at the ends under good light or magnification. If you see any white dots or fraying, your shears are dull.
Sign 3: The Shears Are Pushing Hair Instead of Cutting It
What it feels like: You close the blades, but instead of cutting, the hair slides forward. The shears seem to be pushing the hair away from the blades.
What’s happening: The blades are no longer meeting with enough tension or sharpness to catch and sever the hair. They’re acting like a wedge, pushing the hair out of the way.
The test: Try to cut a single strand of hair near the ends. If the shears push the strand away or bend it before cutting, they need sharpening.
Sign 4: You Hear a Clicking or Grinding Sound
What it sounds like: A metallic click when you close the blades. A grinding or scraping sound. Any noise other than a clean “snikt.”
What’s happening: The blades are misaligned. They may be hitting each other instead of gliding past each other. This damages the edge and makes cutting impossible.
The test: Close your shears slowly while listening. Open and close them several times. Any unusual noise is a problem.
Sign 5: The Shears Are Pulling Hair
What it feels like: The client flinches. You feel resistance. Hair catches between the blades instead of being cut.
What’s happening: The blades are so dull that they can’t penetrate the hair shaft. They’re grabbing and pulling instead of slicing.
The test: Cut a piece of tissue paper or lightweight cotton. If the shears pull or tear instead of cutting cleanly, they are dangerously dull.
Sign 6: You’re Getting Uneven Results
What it looks like: Your cuts don’t look as clean as they used to. You’re spending more time refining. The perimeter looks slightly uneven even though you followed your guide.
What’s happening: Dull shears don’t cut where you place them. They push, drift, or crush, creating micro-imperfections that add up to a noticeably uneven result.
The test: Compare a recent haircut to one from three months ago. If the quality has declined but your technique hasn’t changed, your shears are the problem.
Sign 7: Your Hand or Wrist Hurts After a Shift
What it feels like: Fatigue in your thumb joint. Aching in your wrist. Tingling in your fingers. General hand tiredness that didn’t used to be there.
What’s happening: Dull shears require more pressure. More pressure strains the small muscles and tendons in your hand. Over time, this leads to repetitive strain injuries, carpal tunnel, and tendinitis.
The test: Pay attention to how your hand feels after a full day of cutting. If you’re noticing new pain or fatigue, check your shears first.
The Quick Tests (Do These Today)
The Paper Test
Take a piece of printer paper
Hold the shears in your dominant hand
Cut across the paper about 1 inch from the edge
Observe:
Result Meaning
Clean, smooth cut Shears are sharp
Ragged, torn edge Shears are dull
Paper folds instead of cutting Shears are dangerously dull
The Light Test
Hold the shears open
Look at the blades under a bright light
Look for:
What You See Meaning
A thin, shiny line along the edge The blade is still sharp
A thick, dull line or visible flat spot The blade is dull
Nicks, chips, or visible damage The blade needs professional repair
The Single Hair Test
Take a single strand of hair (from a brush or mannequin)
Hold it taut between your fingers
Cut the strand about 1 inch from the end
Observe:
Result Meaning
Hair cuts cleanly with minimal pressure Shears are sharp
Hair bends, pushes, or requires multiple attempts Shears are dull
You hear a “ping” sound Shears are sharp
How Often Should You Sharpen Your Shears?
There is no universal answer. It depends on how much you cut, what you cut, and how you care for your shears.
Usage Level Recommended Sharpening Frequency
Full-time stylist (20+ cuts per week) Every 3-4 months
Part-time stylist (10-15 cuts per week) Every 4-6 months
Occasional stylist (5-10 cuts per week) Every 6-8 months
Student or beginner Every 8-12 months
The better rule: Sharpen your shears when they fail any of the tests above. Don’t wait for a calendar date. Let your tools tell you when they need help.
What Happens If You Keep Using Dull Shears
Consequence Why It Happens
Damage to the blades Dull shears become more dull. Eventually, they need professional repair, not just sharpening.
Damage to the hair Split ends, frizz, and uneven cuts that clients will notice and complain about.
Damage to your body Repetitive strain injuries, carpal tunnel, and chronic pain that can end your career.
Damage to your reputation Clients notice when their hair doesn’t feel right. They may not know why, but they know something is off.
Damage to your efficiency You spend more time refining, fixing, and correcting. Dull shears slow you down.
A $50 sharpening is much cheaper than a $500 pair of new shears, a $5,000 medical bill, or a lost client who never comes back.
How to Prevent Premature Dullness
Do Don’t
Clean your shears after every client Cut paper, cardboard, or packaging
Oil the pivot daily Drop your shears (even on carpet)
Store them in a protective case or pouch Use them to cut anything other than hair
Tighten the tension screw when loose Let another stylist borrow them
Send them to a professional sharpener Use a home sharpening kit (you’ll ruin the edge)
The “One More Cut” Trap
Every stylist has done it. You know your shears are getting dull. But you have one more client. One more cut. You’ll sharpen them tomorrow.
That “one more cut” is where the damage happens. That is the client who gets the frayed ends. That is the cut you have to fix. That is the moment you wish you had stopped earlier.
The rule: When you suspect your shears are dull, stop. Switch to a backup pair. Send the dull pair for sharpening immediately. Do not take “one more cut.”
The Difference Between Dull and Misaligned
Sometimes the problem isn’t sharpness. It’s alignment.
Symptom Likely Problem
Shears push hair but cut paper cleanly Misalignment, not dullness
Clicking sound when closing Misalignment
One blade passes over the other instead of cutting Misalignment
Shears won’t cut at the tips but cut fine in the middle Misalignment or bent blade
Misalignment can often be fixed by adjusting the tension screw. If that doesn’t work, send them to a professional.
Your shears are the most important tool you own. They are an extension of your hands. When they are sharp, you work faster, cut cleaner, and feel less fatigue. When they are dull, everything suffers—your cuts, your body, your clients, and your reputation.
You don’t need to guess whether your shears are sharp. The tests in this guide take less than two minutes. Do them today. If your shears fail, stop using them. Send them for sharpening. Use your backup pair.
Your future self—and your future clients—will thank you.